1 Camera Device Instruction Manual
1.1. Application Instructions
Description: The customer subscribes the camera to the Frukari App.
Condition: Signed in to the Frukari App with owner rights and on the Home screen.
Steps:
Step 1: Tap «Add Device» (Icon ![]() ).
).
Step 2: Select «Wifi Camera» Device Type.
Step 3: Put the device into connection mode according to the instructions and Press «Continue».
Step 4: Scan the QR of the device.
Step 5: Press «Continue».
Step 6: Enter the home Wifi network information: «Wifi Name» & «Password».
Step 7: Press «Continue».
Step 8: Wait for the registration process to take place successfully
Step 7: Wait for the automatic registration process to take place successfully.
(Note: The registration process may fail due to the following reasons:
1. At B3: Operation according to the wrong instructions
2. At B6: Enter the wrong home Wifi network information)
Step 8: Perform the device name assignment.
B9: Press «Finish».

Figure 1: Tap «Add Device» (Icon ![]() ).
).

Figure 2: Select the «Camera» Device Type.
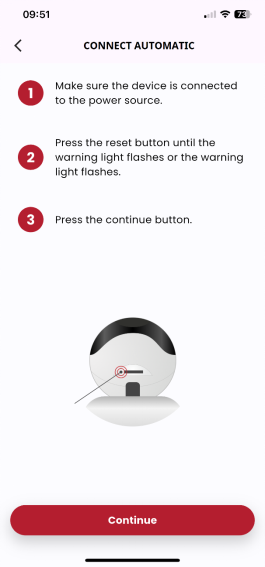
Figure 3: Put the device into connection mode according to the instructions and Press «Continue».
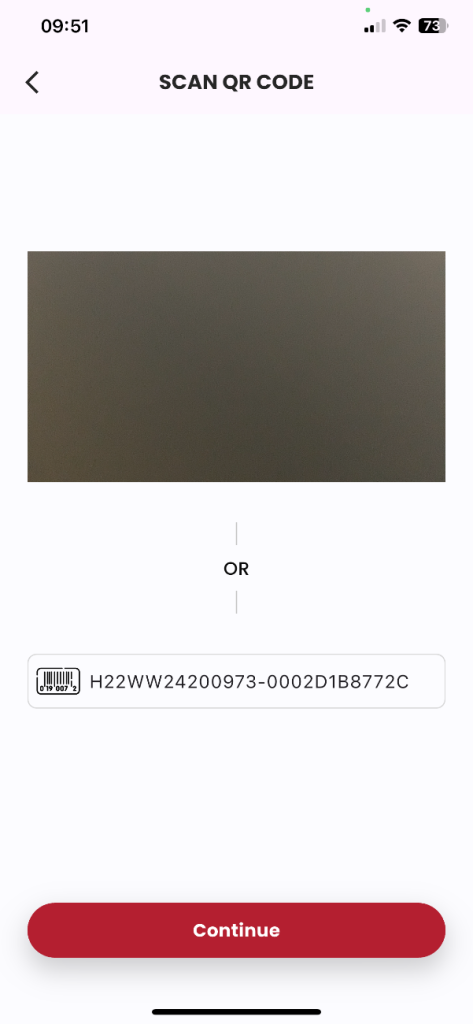
Figure 4: Scan the device QR, press «Continue».

Figure 5: Enter the home Wifi network information: «Wifi Name» & «Password», click «Continue».

Figure 6: Wait for the registration process to take place successfully
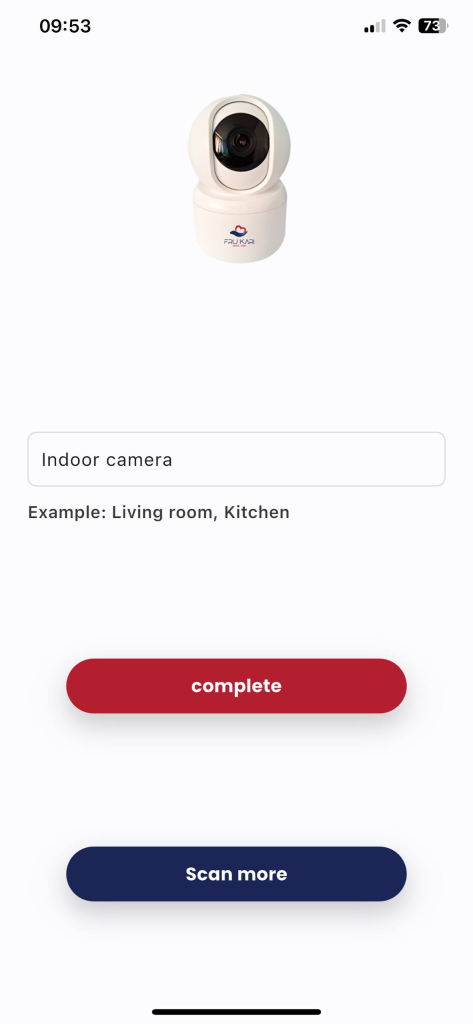
Figure 7: To perform the device name assignment, press «Done».
1.2. Live viewing guide
Description: Customers monitor directly through the camera on the Frukari app.
Condition: The camera is registered with the Frukari App and is on the Home screen.
Steps:
Step 1: Press the camera to be monitored.

Figure 1: Press the camera to be monitored.

Figure 2: Camera live view screen
1.3. How to turn the sound on/ off
Description: Customer enables/disables camera audio on the Frukari app.
Condition: The camera is registered with the Frukari App and is on the Home screen.
Steps:
Step 1: Press the camera to be monitored.
Step 2: Press the speaker icon on the monitoring screen to turn the sound on/off

Figure 1: Press the camera to be monitored.

Figure 2: Press the speaker icon on the monitoring screen to turn the sound on/off
1.4. Video Recording Instructions
Description: Customer records video while monitoring on the Frukari app.
Condition: The camera is registered with the Frukari App and is on the Home screen.
Steps:
Step 1: Press the camera.
Step 2: Press «Record» on the monitoring screen to start recording
Step 3: Press «Stop» on the monitoring screen to end the recording

Figure 1: Press the camera to be monitored.

Figure 2: Press «Record» on the monitoring screen to start recording
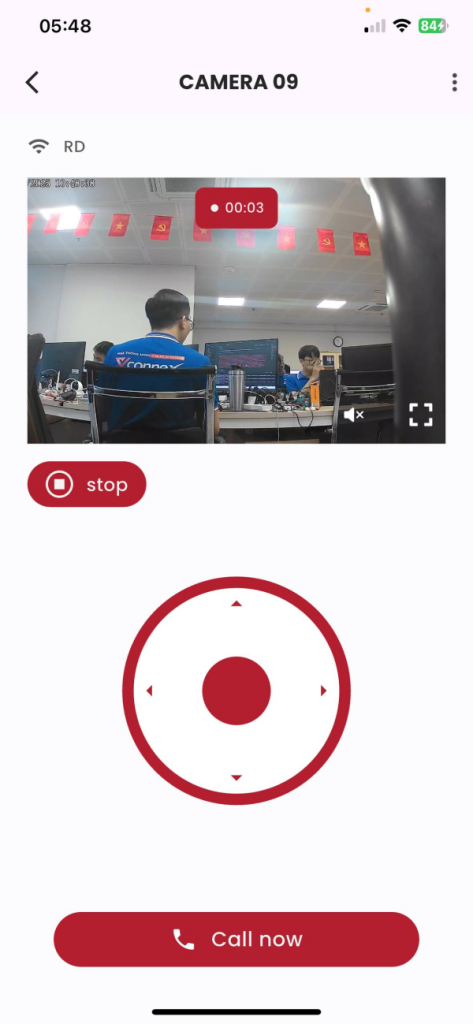
Figure 3: Press «Stop» on the monitoring screen to end the recording
1.5. How to view full screen
Description: Customers view full screen when monitoring on the Frukari app.
Condition: The camera is registered with the Frukari App and is on the Home screen.
Steps:
Step 1: Press the camera.
Step 2: Press «FullScreen» on the monitoring screen

Figure 1: Press the camera to be monitored.

Figure 2: Click «FullScreen» on the monitoring screen
1.6. Navigation Guide
Description: The client navigates the camera on the Frukari app.
Condition: The camera is registered with the Frukari App and is on the Home screen.
Steps:
Step 1: Press the camera.
Step 2: Hold down the navigation keys

Figure 1: Press the camera to be monitored.

Figure 2: Holding down the navigation keys
1.7. Conversation Guide
Description: Client talks on the Frukari app.
Condition: The camera is registered with the Frukari App and is on the Home screen.
Steps:
Step 1: Press the camera.
Step 2: Click «Call now» to start the conversation
Step 3: Press «Call now» again to stop the conversation

Figure 1: Press the camera to be monitored.

Figure 2: Press «Call now» to start a conversation
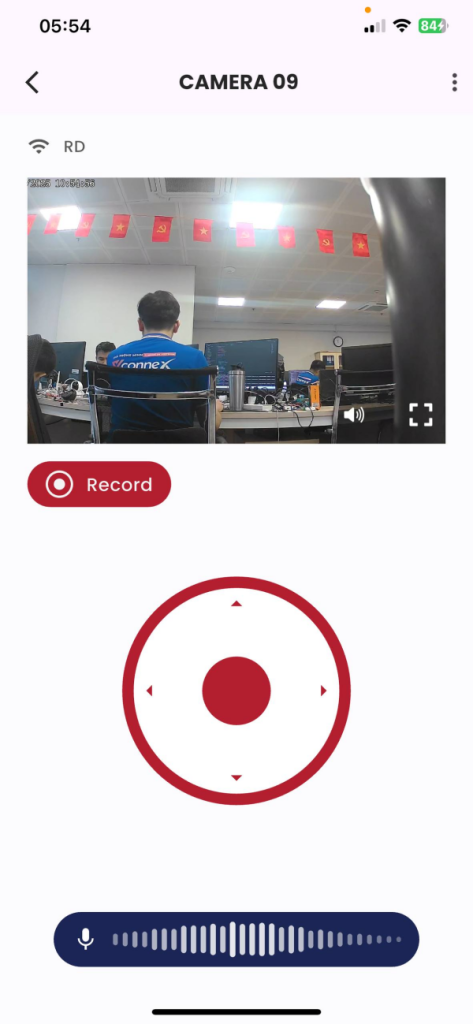
Figure 3: Press «Call now» again to stop the conversation
1.8. Instructions for updating device information
Description: The customer updates the camera information.
Condition: Logged in to the Frukari app with owner rights, camera registration, and being on the Home screen.
Steps:
Step 1: Press the camera.
Step 2: Tap «Setup» (Icon ![]() ).
).
Step 3: Select the «Device Information» section.
Step 4: Set the device name.
Step 5: Tap «Save»

Figure 1: Press the camera to be monitored.

Figure 2: Click «Setup» (Icon ![]() ).
).

Figure 3: Select the «Device Information» section .
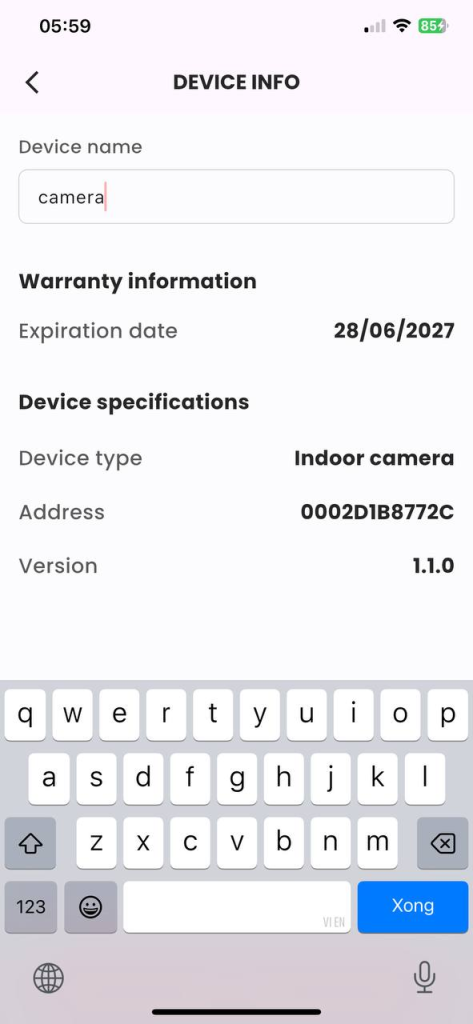
Figure 4: Setting up the device name.
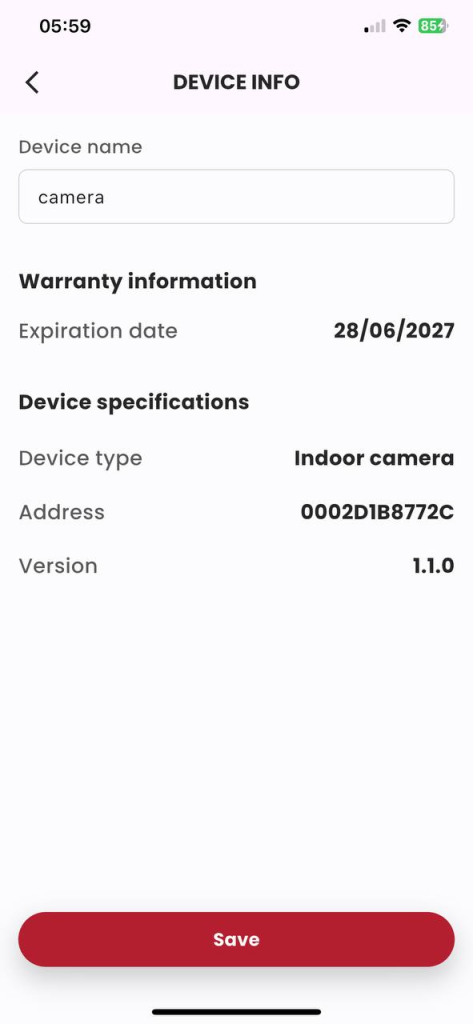
Figure 5: Click «Save»
1.9. Instructions for setting up human identification mode
Description: The customer activates/pauses the person detection mode.
Condition: Logged in to the Frukari app with owner rights, camera registration, and being on the Home screen.
Steps:
Step 1: Press the camera.
Step 2: Tap «Setup» (Icon ![]() ).
).
Step 3: Select the item «Detect people» .
STEP 4: Press the Switch Button ON/OFF slider in the state to be set.

Figure 1: Press the camera to be monitored.

Figure 2: Click «Setup» (Icon ![]() ).
).

Figure 3: Select the «Person Detection» item .
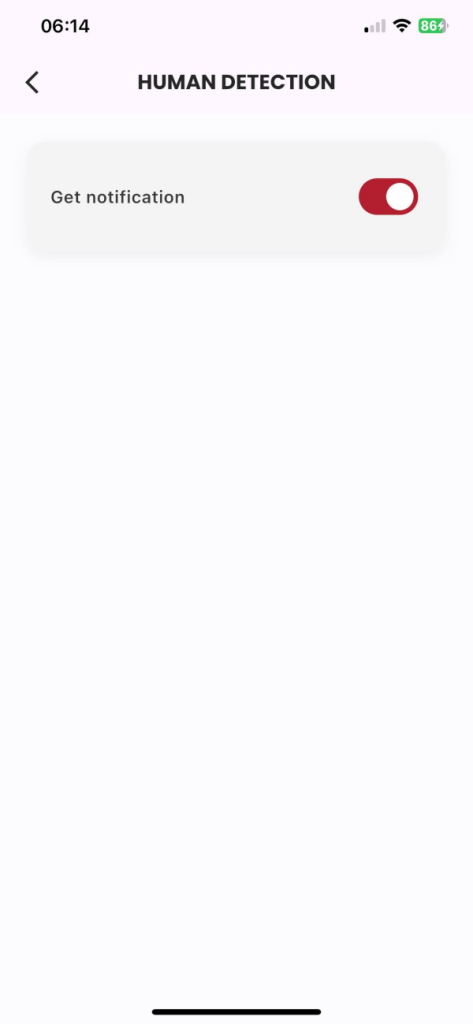
Figure 4: Press the Switch Button ON/OFF slider to set the status.
1.10. Instructions for setting up motion recognition mode
Description: Client activates/pauses motion detection mode.
Condition: Logged in to the Frukari app with owner rights, camera registration, and being on the Home screen.
Steps:
Step 1: Press the camera.
Step 2: Tap «Setup» (Icon ![]() ).
).
Step 3: Select the «Motion Detection» section.
Step 4: Press the Switch Button ON/OFF slider in the state to be set.
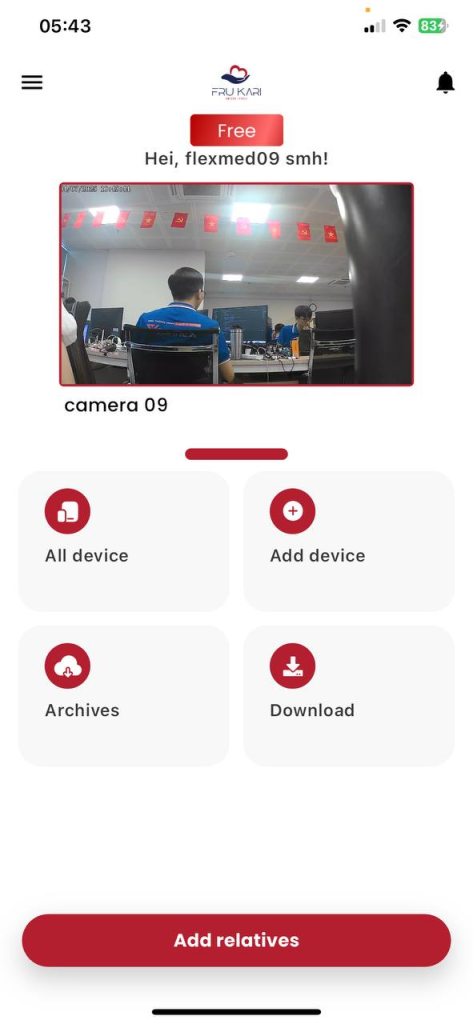
Figure 1: Press the camera to be monitored.

Figure 2: Click «Setup» (Icon ![]() ).
).

Figure 3: Select the «Motion Detection» item .
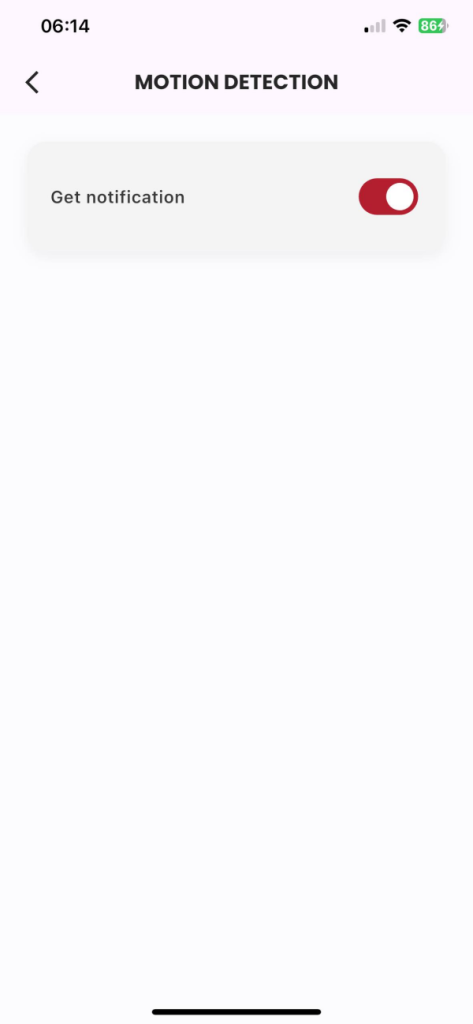
Figure 4: Press the Switch Button ON/OFF slider to set the status.
1.11. Instructions for setting up notification mode.
Description: The customer activates/pauses the notification mode.
Condition: Logged in to the Frukari app with owner rights, camera registration, and being on the Home screen.
Steps:
Step 1: Press the camera.
Step 2: Tap «Setup» (Icon ![]() ).
).
Step 3: Select the «Receive notifications» section.
STEP 4: Press the Switch Button ON/OFF slider in the state to be set.

Figure 1: Press the camera to be monitored.

Figure 2: Click «Setup» (Icon ![]() ).
).
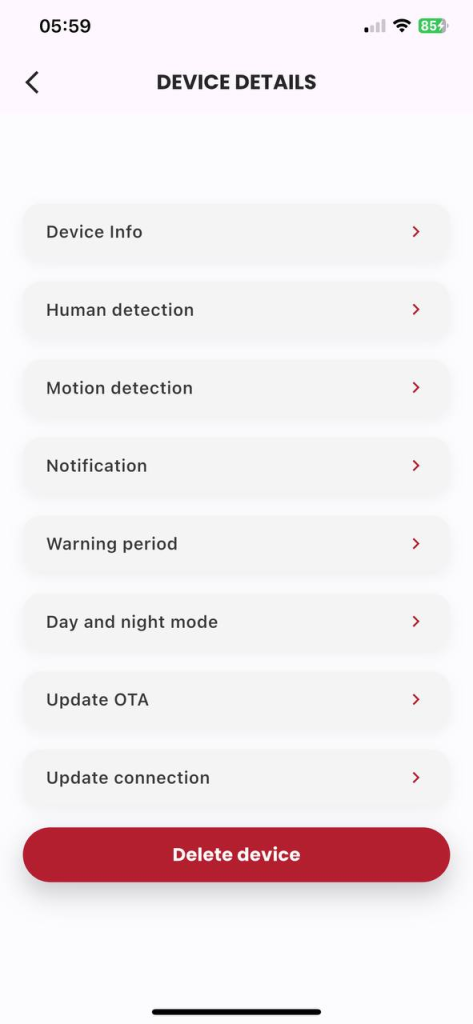
Figure 3: Select the «Receive notifications» item.
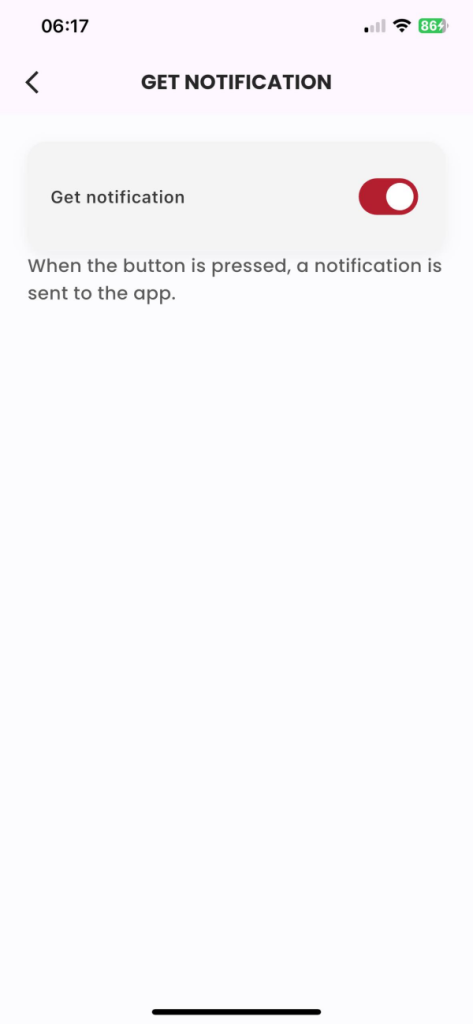
Figure 4: Press the Switch Button ON/OFF slider to set the status.
1.12. Instructions for setting the alarm interval
Description: The customer selects the time interval for sending notifications.
Condition: Logged in to the Frukari app with owner rights, camera registration, and being on the Home screen.
Steps:
Step 1: Press the camera.
Step 2: Tap «Setup» (Icon ![]() ).
).
Step 3: Select the item «Warning period» .
Step 4: Select the time to set up.

Figure 1: Press the camera to be monitored.

Figure 2: Click «Setup» (Icon ![]() ).
).

Figure 3: Select the «Warning Period» item .
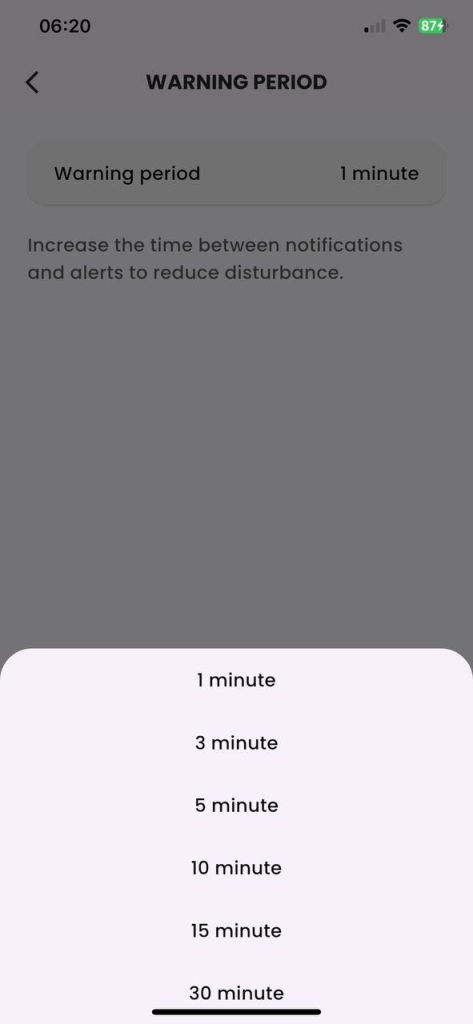
Figure 4: Select the time to set.
1.13. How to set up day and night mode
Description: The customer sets the day-night or automatic operation mode for the camera depending on the ambient light.
Condition: Logged in to the Frukari app with owner rights, camera registration, and being on the Home screen.
Steps:
Step 1: Press the camera.
Step 2: Tap «Setup» (Icon ![]() ).
).
Step 3: Select the «Day and Night Mode» section.
Step 4: Select the mode to be set.

Figure 1: Press the camera to be monitored.

Figure 2: Click «Setup» (Icon ![]() ).
).

Figure 3: Select the «Day and Night Mode» item.
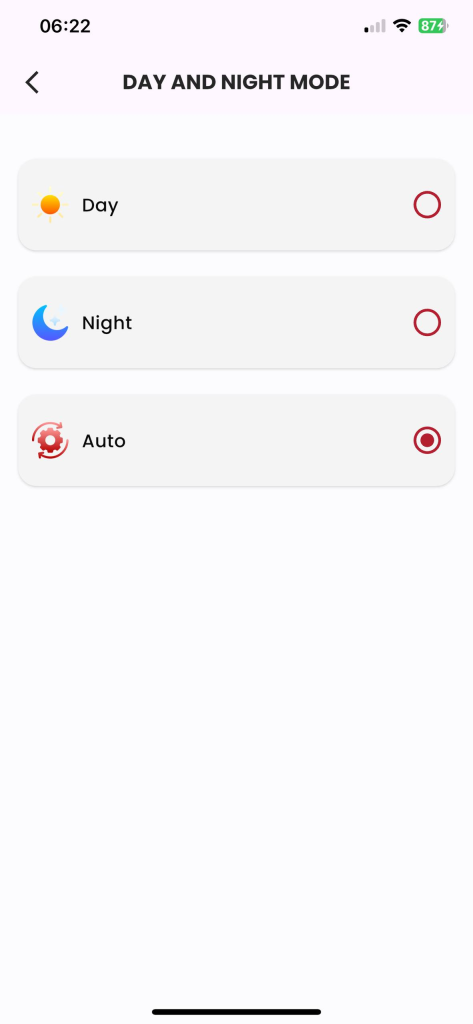
Figure 4: Select the mode to be set.
1.14. How to update your device version
Description: The customer updates the device version.
Condition: Logged in to the Frukari app with owner rights, camera registration, and being on the Home screen.
Steps:
Step 1: Press the camera.
Step 2: Tap «Setup» (Icon ![]() ).
).
Step 3: Select the «OTA Update» section.
Step 4: Tap «Update»
(Note: At step 4, the Update button is only visible when the device has not been updated to the latest available version.)

Figure 1: Press the camera to be monitored.

Figure 2: Click «Setup» (Icon ![]() ).
).

Figure 3: Select the «OTA Update» item.

Figure 4: Click «Update»
1.15. Connection update instructions
Description: The customer updates the device connection.
Condition: Logged in to the Frukari app with owner rights, camera registration, and being on the Home screen.
Steps:
Step 1: Press the camera.
Step 2: Tap «Setup» (Icon ![]() ).
).
Step 3: Select the «Update Connection» section.
Step 4: Put the device into connection mode according to the instructions and Press «Continue».
Step 5: Press «Continue».
Step 6: Enter the home Wifi network information: «Wifi Name» & «Password».
Step 7: Press «Continue».
Step 8: Wait for the registration process to take place successfully
(Note: The registration process may fail due to the following reasons:
1. At B3: Operation according to the wrong instructions
2. At B6: Enter the wrong home Wifi network information)
Step 9: Perform device name assignment.
B10: Press «Finish».

Figure 1: Press the camera to be monitored.

Figure 2: Click «Setup» (Icon ![]() ).
).

Figure 3: Select the «Update Connection» item.

Figure 4: Putting the device into connection mode according to the instructions and Press «Continue».
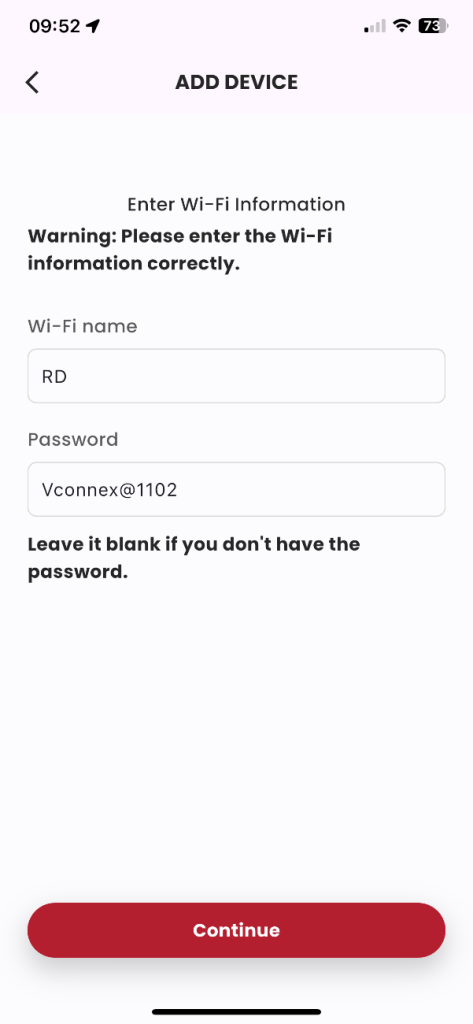
Figure 6: Enter the home Wifi network information: «Wifi Name» & «Password», press «Continue».
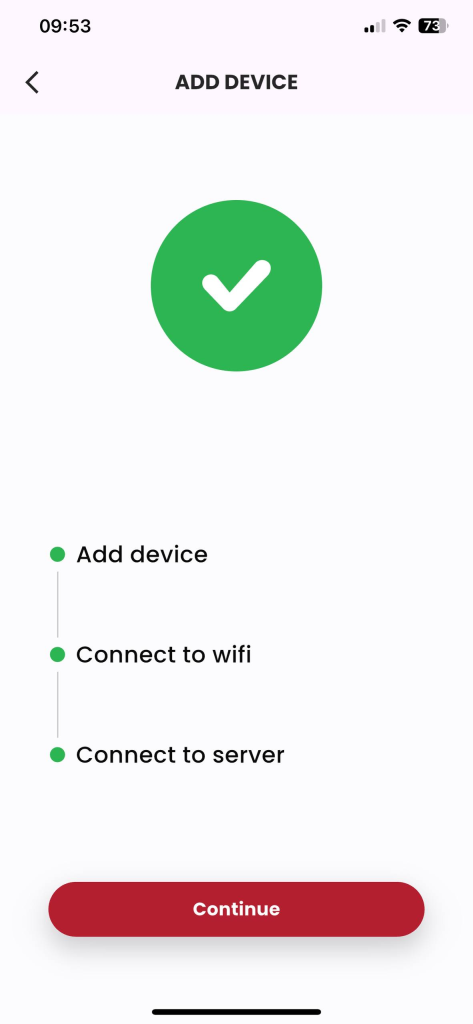
Figure 7: Wait for the registration process to take place successfully

Figure 8: To perform the device name assignment, press «Done».
1.16. Instructions for removing the device
Description: Customer erases device.
Condition: Logged in to the Frukari app with owner rights, camera registration, and being on the Home screen.
Steps:
Step 1: Press the camera.
Step 2: Tap «Setup» (Icon ![]() ).
).
Step 3: Tap «Delete» .
Step 4: Tap the «Agree» popup Confirm.

Figure 1: Press the camera to be monitored.

Figure 2: Click «Setup» (Icon ![]() ).
).

Figure 3: Click «Delete»
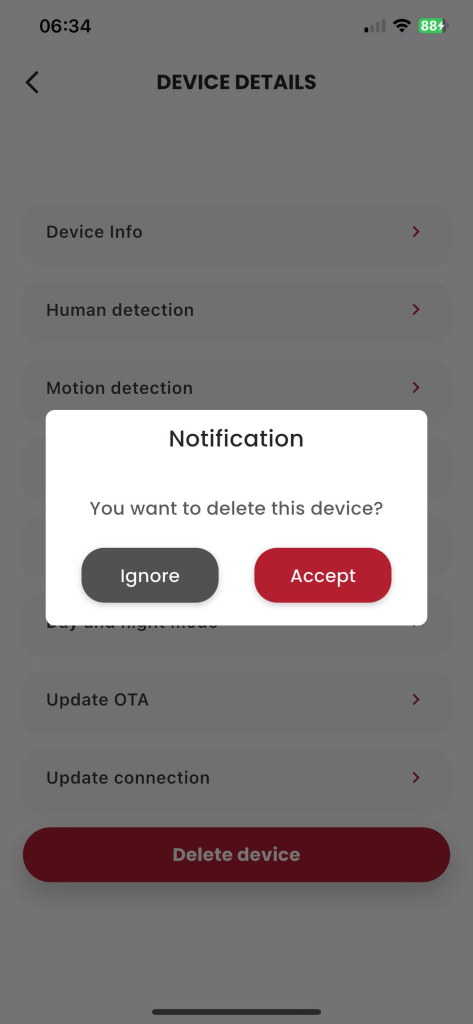
Figure 4: Click the «Agree» confirmation popup.
2. Door Sensor Device Instruction Manual
2.1. Automatic Registration Instructions
- Description: The customer registers the door sensor in the Frukari App in an automated manner.
- Condition: Signed in to the Frukari App with owner rights and on the Home screen.
- Steps:
Step 1: Tap «Add Device» (Icon ![]() ).
).
Step 2: Select the «Door Sensor» Device Type.
Step 3: Enter the home Wifi network information: «Wifi Name» & «Password»
Step 4: Press «Continue».
Step 5: Follow the instructions and press the «Continue» button.
Step 6: Select the registration device
Step 7: Press «Continue».
Step 8: Wait for the automatic registration process to take place successfully.
(Note: The registration process may fail due to the following reasons:
- 1. At B3: Enter the wrong home Wifi network information
- 2. At B5: Operation according to the wrong instructions)
B9: Press «Finish».

Figure 1: Tap «Add Device» (Icon ![]() ).
).

Figure 2: Select the «Door Sensor» Device Type.

Figure 3: Enter the home Wifi network information: «Wifi Name» & «Password», press «Continue».

Figure 4: Follow the instructions and press the «Continue» button.

Figure 5: Select the registered device, press «Continue».

Figure 6: Wait for the automatic registration process to take place successfully, click «Finish».
2.2. Manual Registration Instructions
- Description: The customer registers the door sensor in the Frukari App manually.
- Condition: Signed in to the Frukari App with owner rights and on the Home screen.
- Steps:
Step 1: Tap «Add Device» (Icon ![]() ).
).
Step 2: Select the «Door Sensor» Device Type.
Step 3: Enter the home Wifi network information: «Wifi Name» & «Password»
Step 4: Press «Continue».
Step 5: Tap «Setup» (Icon ![]() ).
).
Step 6: Select «Manual»
Step 7: Follow the instructions and press the «Continue» button.
Step 8: Press «Go to Connection» and make the wifi connection hostpost the device in the form of «FRUKARI-XXXX»
Step 7: Return to the app and press «Continue».
Step 9: Wait for the automatic registration process to take place successfully.
(Note: The registration process may fail due to the following reasons:
- 1. At B3: Enter the wrong home Wifi network information
- 2. At B7: Operation according to the wrong instructions)
Step 10: Switch back to wifi declared in step 3 (If required by the system)
B11: Press «Finish».

Figure 1: Tap «Add Device» (Icon ![]() ).
).
Figure 2: Select the «Door Sensor» Device Type.

Figure 3: Enter the home Wifi network information: «Wifi Name» & «Password», press «Continue».

Figure 4: Click «Setup» (Icon ![]() ).
).
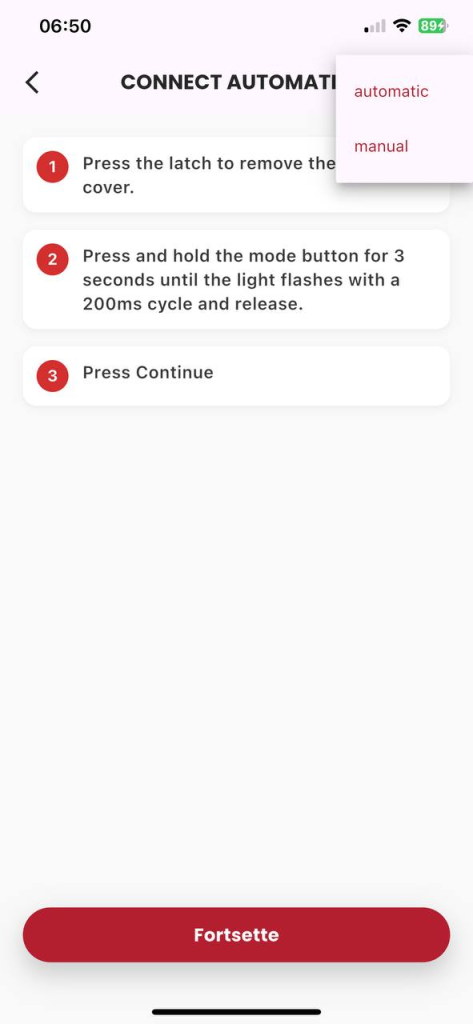
Figure 5: Select «Manual»

Figure 6: Follow the instructions and press the «Continue» button.

Figure 7: Press «Go to Connection» and make a wifi connection hostpost the device in the form of «FRUKARI-XXXX»
15

Figure 8: Return to the app and tap «Continue».

Figure 10: Switch back to wifi declared in step 3 (If the system requires it)
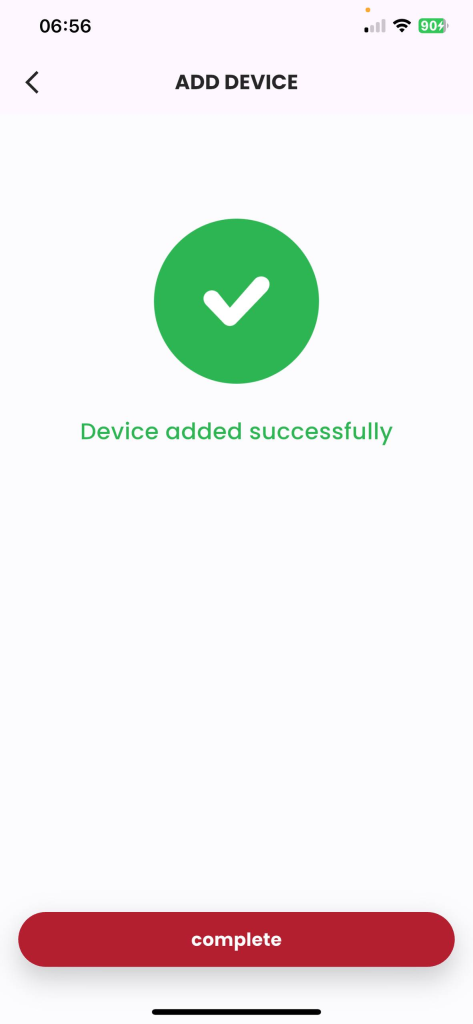
Figure 10: Wait for the manual registration process to take place successfully,
2.3. Status Monitoring Guide
- Description: The customer monitors the device activity status on the Frukari app.
- Condition: The door sensor is registered with the Frukari App and is on the Home screen.
- Steps:
Step 1: Tap «All Devices».
Step 2: Press Door Sensor

Figure 1: Tap «All Devices»

Figure 2: Press the Door Sensor

Figure 3: The main monitoring screen of the device
2.4. Instructions for managing device activity history
- Description: The customer views the device activity history on the Frukari app.
- Eligibility: Have registered the door sensor with the Frukari App, have purchased the Standard/ Preemium package and are on the Home screen.
- Steps:
Step 1: Tap «All Devices».
STEP 2: Press the door sensor
Step 3: Tap «Activity History»
Figure 1: Tap «All Devices»

Figure 2: Press the Door Sensor

Figure 3: Click «History»
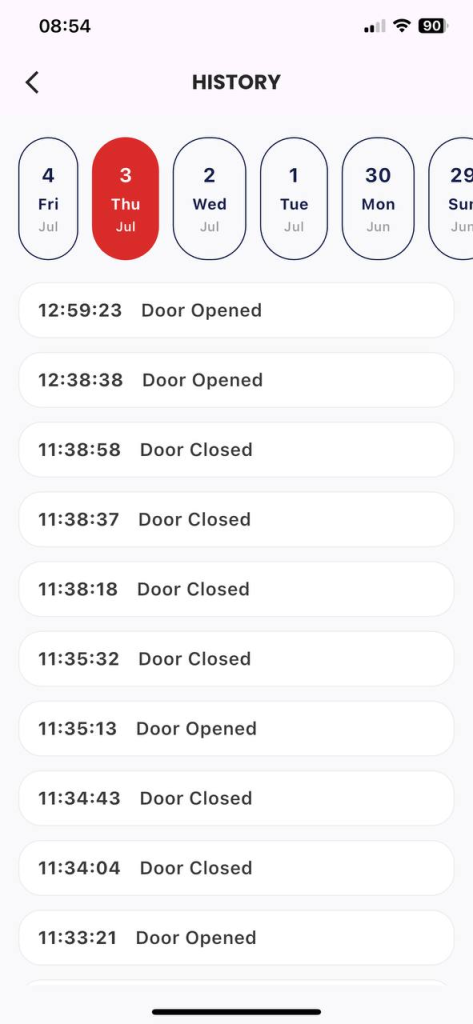
Figure 4: Device history screen
2.5. Instructions for updating device information
- Description: The customer updates the door sensor information.
- Condition: Logged in to the Frukari app with owner rights, registered door sensors, and on the Home screen.
- Steps:
Step 1: Tap «All Devices».
Step 2: Press the door sensor
Step 3: Tap «Setup» (Icon ![]() ).
).
Step 4: Select the «Device Information» section.
Step 5: Set the device name.
Step 6: Click «Save»
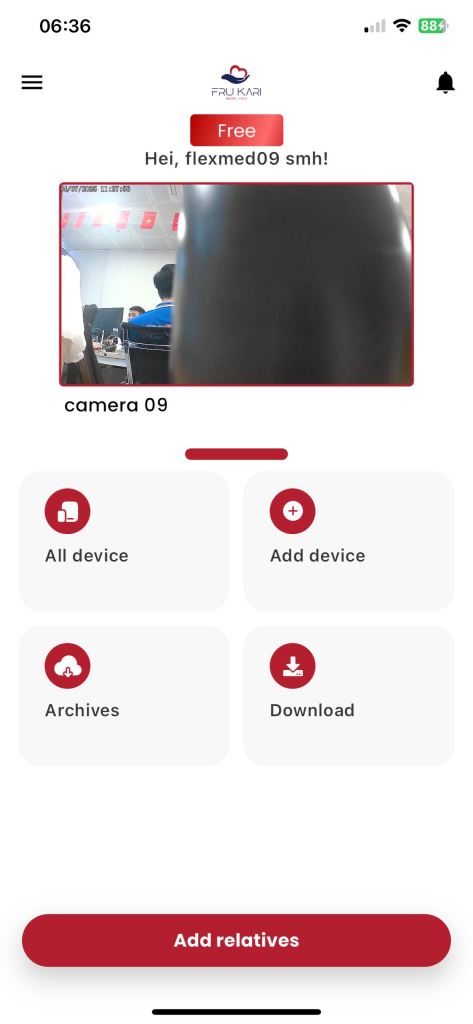
Figure 1: Tap «All Devices»

Figure 2: Press the Door Sensor

Figure 3: Click «Setup» (Icon ![]() ).
).

Figure 4: Select the «Device Information» section .
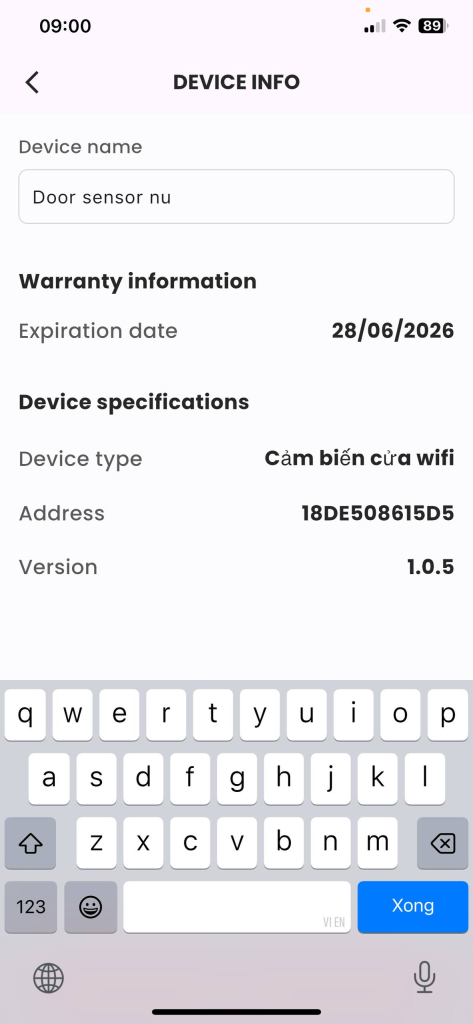
Figure 5: Setting up the device name.
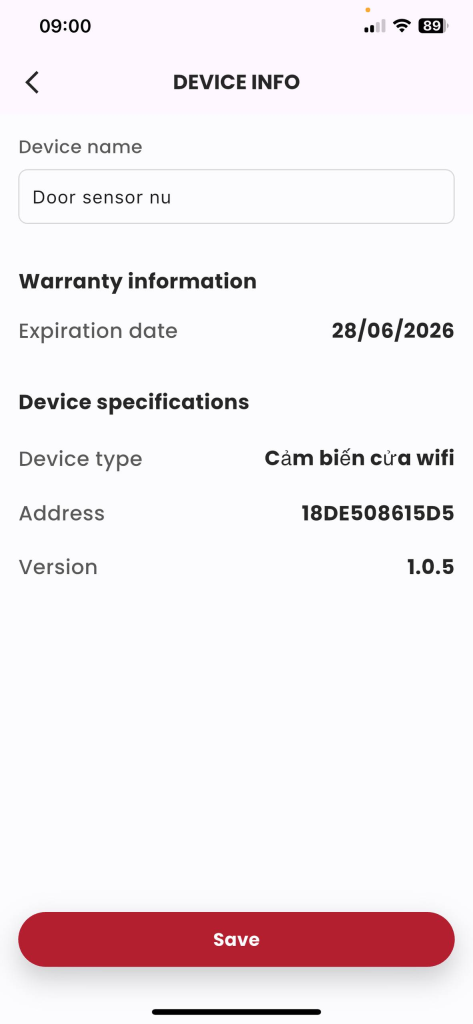
STEP 6: Click «Save»
2.6. Instructions for setting up notification mode
- Description: The customer activates/pauses the notification mode.
- Condition: Logged in to the Frukari app with owner rights, registered door sensors, and on the Home screen.
- Steps:
Step 1: Tap «All Devices».
STEP 2: Press the door sensor
Step 3: Tap «Setup» (Icon ![]() ).
).
Step 4: Select the «Receive notifications» section.
Step 5: Press the Switch Button ON/OFF slider, select the state to be set.

Figure 1: Tap «All Devices»

Figure 2: Press the Door Sensor

Figure 3: Click «Setup» (Icon ![]() ).
).
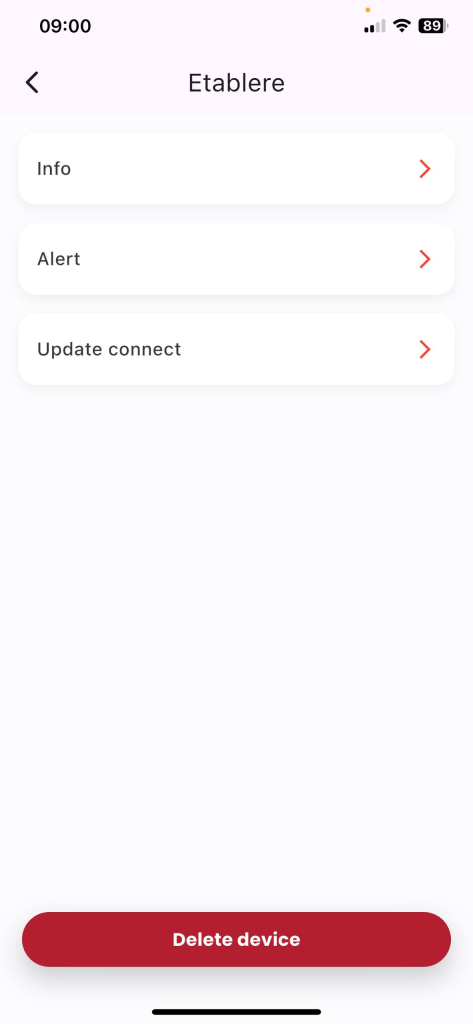
Figure 4: Select the «Receive notifications» section.
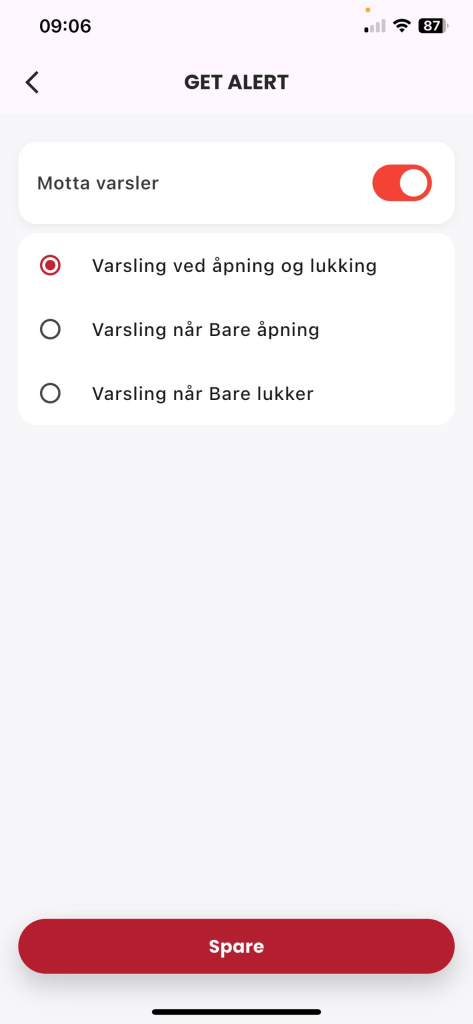
Figure 5: Press the Switch Button ON/OFF slider, select the state to be set.
2.7. Automatic Connection Update Instructions
- Description: The customer updates the door sensor connection by automatic method.
- Condition: Logged in to the Frukari app with owner rights, registered door sensors, and on the Home screen.
- Steps:
Step 1: Tap «All Devices».
Step 2: Press the door sensor
Step 3: Tap «Setup» (Icon ![]() ).
).
Step 4: Tap «Update Connection»
Step 5: Enter the home Wifi network information: «Wifi Name» & «Password»
Step 6: Tap «Continue».
Step 7: Follow the instructions and press the «Continue» button.
Step 8: Select the device to update the connection
Step 9: Press «Continue».
Step 10: Wait for the automatic registration process to take place successfully.
(Note: The registration process may fail due to the following reasons:
- 1. At B5: Enter the wrong home Wifi network information
- 2. At B7: Operation according to the wrong instructions)
B11: Press «Finish».

Figure 1: Tap «All Devices»
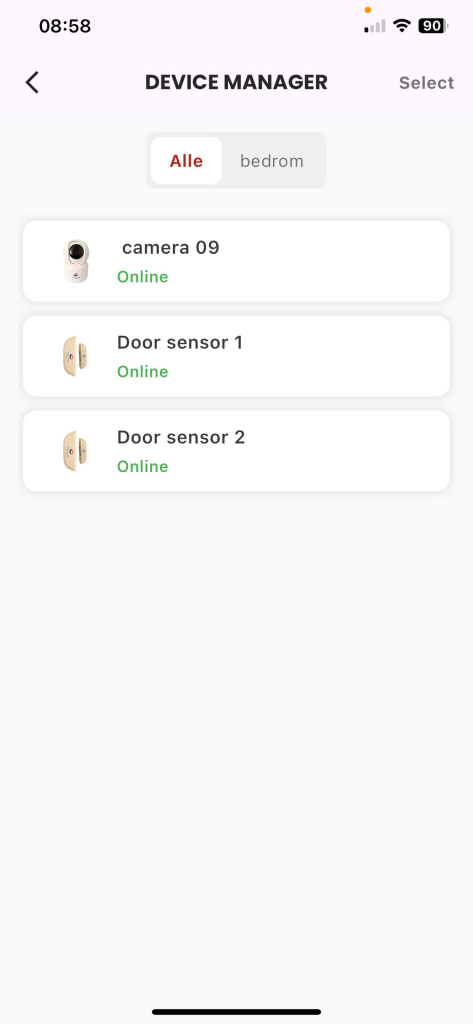
Figure 2: Press the Door Sensor

Figure 3: Click «Setup» (Icon ![]() ).
).

Figure 4: Tap «Update Connection»

Figure: Enter the home Wifi network information: «Wifi Name» & «Password», click «Continue».
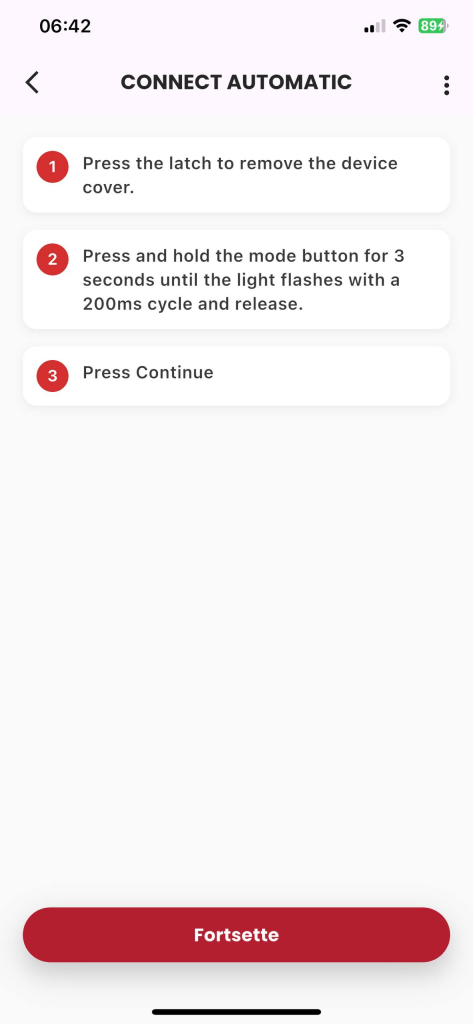
Figure 6: Follow the instructions and press the «Continue» button.
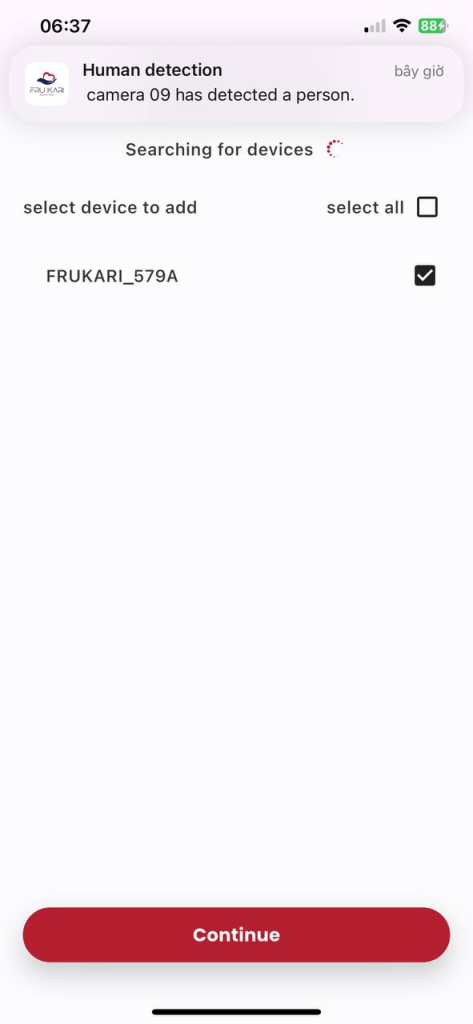
Figure 7: Select the registered device, press «Continue».
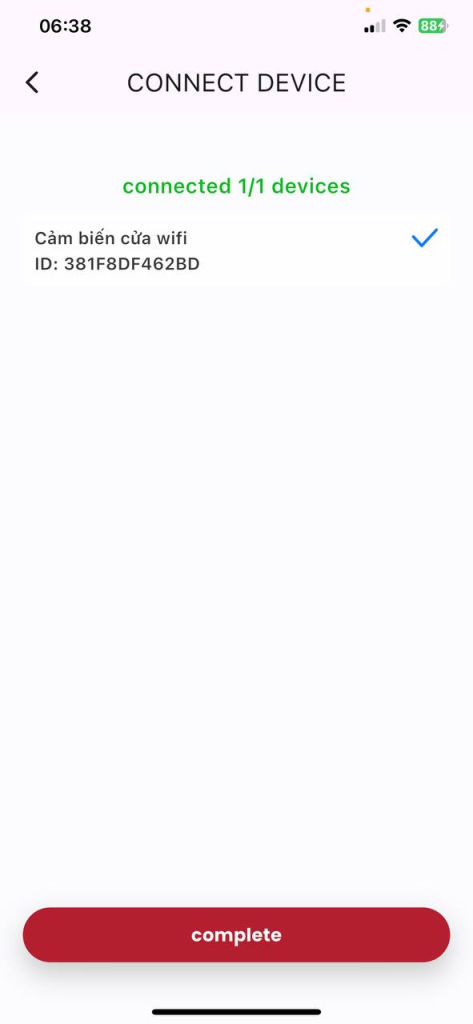
Figure 8: Wait for the automatic registration process to take place successfully, click «Finish».
2.8. Manual Connection Update Instructions
- Description: The customer connects the door sensor to the Frukari App manually.
- Condition: Logged in to the Frukari app with owner rights, registered door sensors, and on the Home screen.
- Steps:
Step 1: Tap «All Devices».
Step 2: Press the door sensor
Step 3: Tap «Setup» (Icon ![]() ).
).
Step 4: Tap «Update Connection»
Step 5: Enter the home Wifi network information: «Wifi Name» & «Password»
Step 6: Tap «Continue».
Step 7: Tap «Setup» (Icon ![]() ).
).
Step 8: Select «Manual».
Step 9: Follow the instructions and press the «Continue» button.
Step 10: Press «Go to Connection» and make the wifi connection hostpost the device in the form of «FRUKARI-XXXX»
Step 11: Return to the app and press «Continue».
Step 12: Wait for the automatic registration process to take place successfully.
(Note: The registration process may fail due to the following reasons:
- 1. At STEP 4: Enter the wrong home Wifi network information
- 2. At B6: Operation according to wrong instructions)
Step 13: Switch to wifi declared in step 3 (If the system requires it)
Step 14: Tap «Finish».

Figure 1: Tap «All Devices»

Figure 2: Press the Door Sensor

Figure 3: Click «Setup» (Icon ![]() ).
).

Figure 4: Tap «Update Connection»
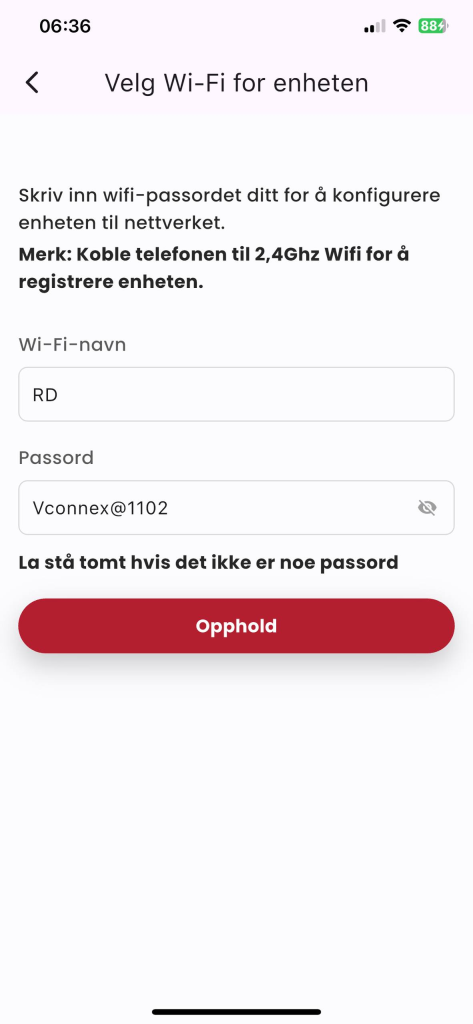
Figure 5: Enter the home Wifi network information: «Wifi Name» & «Password», click «Continue».

Figure 6: Click «Setup» (Icon ![]() ).
).

Figure 7: Select «Manual»
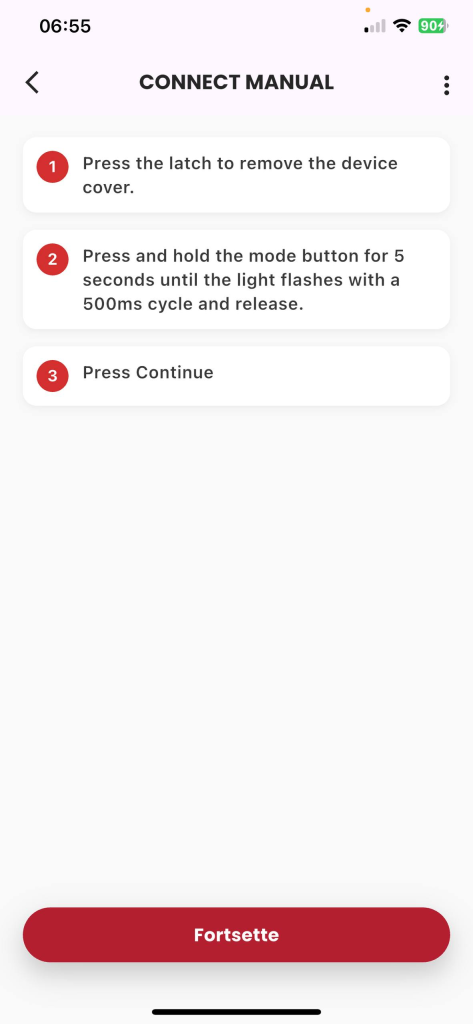
Figure 8: Follow the instructions and press the «Continue» button.
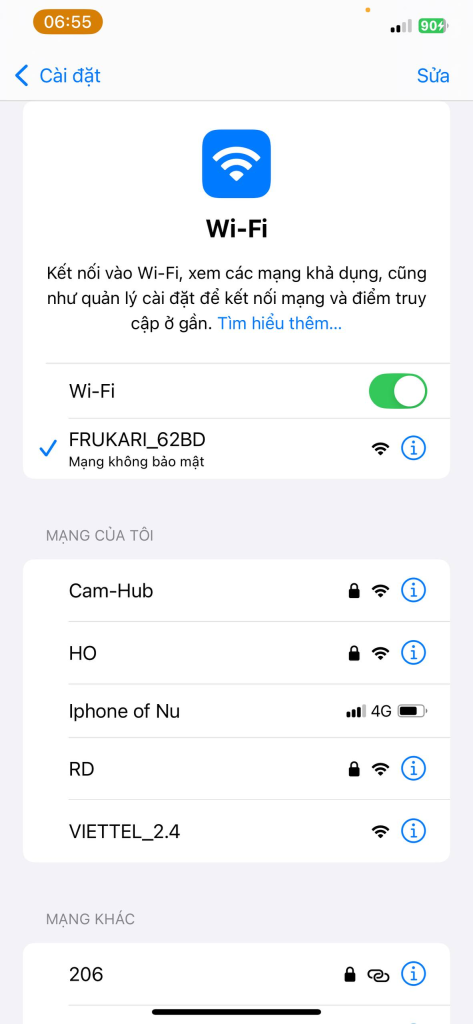
Figure 9: Press «Go to Connection» and make a wifi connection to host the device in the form «FRUKARI-XXXX»
15
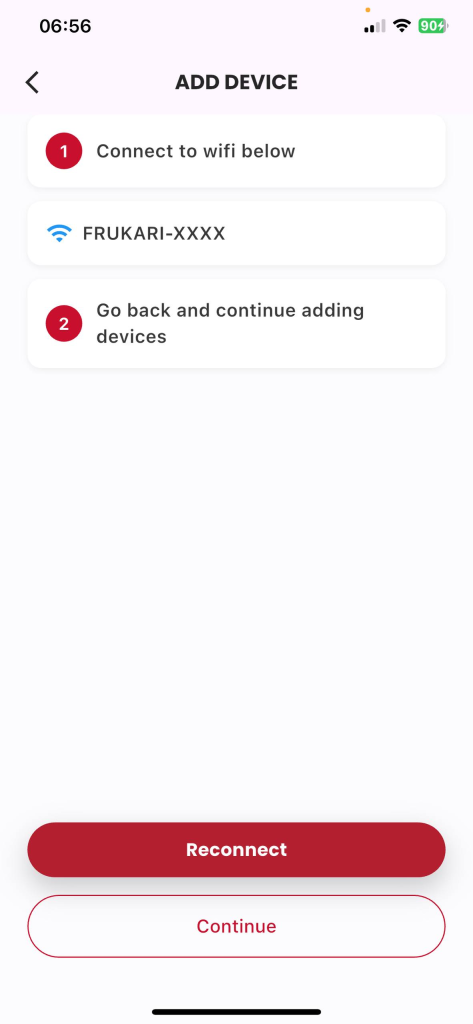
Figure 10: Return to the app and tap «Continue».
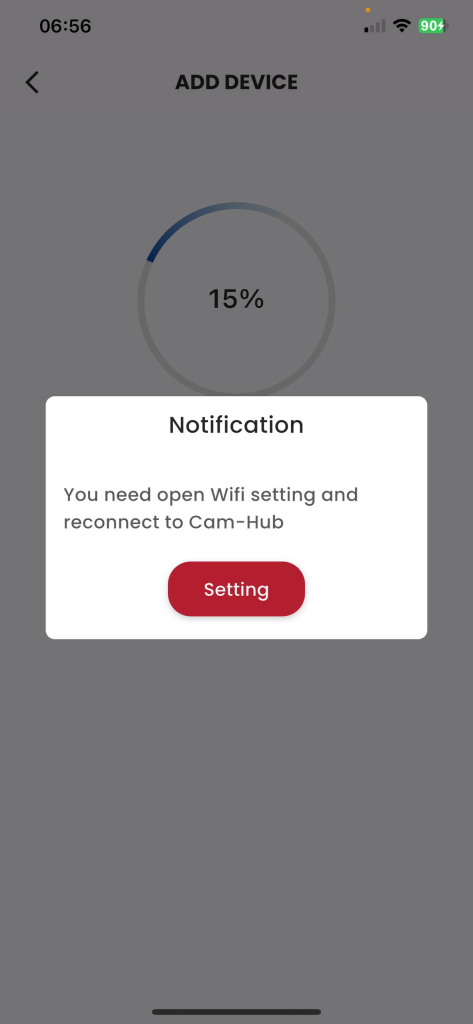
Figure 11: Switch back to wifi declared in step 3 (If required by the system)

Figure 12: Wait for the manual registration process to take place successfully, press «Finish».
2.9. Instructions for removing the device
-
-
- Description: Customer erases device.
- Condition: Logged in to the Frukari app with owner rights, registered door sensors, and on the Home screen.
- Steps:
Step 1: Tap «All Devices».
Step 2: Press the door sensor
Step 3: Tap «Setup» (Icon ![]() ).
).
Step 4: Tap «Remove Device» .
Step 5: Click the «Agree» popup Confirm.

Figure 1: Tap «All Devices»

Figure 2: Press the Door Sensor

Figure 3: Click «Setup» (Icon ![]() ).
).

Figure 4: Tap «Erase Device»
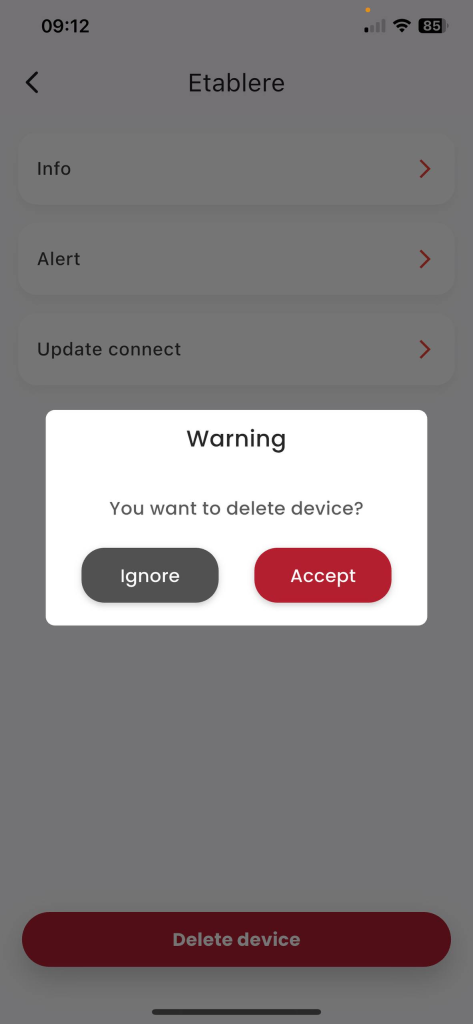
Figure 5: Click the «Agree» confirmation popup.
3. Wireless Push Button Device User Manual
3.1. Automatic Registration Instructions
- Description: The customer subscribes to the wireless push button to the Frukari App in an automated manner.
- Condition: Signed in to the Frukari App with owner rights and on the Home screen.
- Steps:
Step 1: Tap «Add Device» (Icon ![]() ).
).
Step 2: Select the «Wireless Push Button» Device Type.
Step 3: Enter the home Wifi network information: «Wifi Name» & «Password»
Step 4: Press «Continue».
Step 5: Follow the instructions and press the «Continue» button.
Step 6: Select the registration device
Step 7: Press «Continue».
Step 8: Wait for the automatic registration process to take place successfully.
(Note: The registration process may fail due to the following reasons:
- 1. At B3: Enter the wrong home Wifi network information
- 2. At B5: Operation according to the wrong instructions)
B9: Press «Finish».

Figure 1: Tap «Add Device» (Icon ![]() ).
).
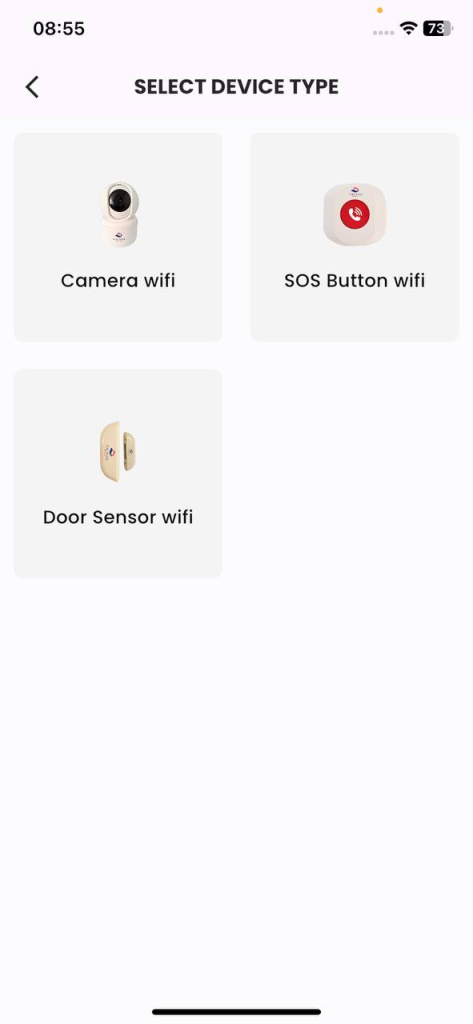
Figure 2: Select «Wireless Push Button» Device Type.

Figure 3: Enter the home Wifi network information: «Wifi Name» & «Password», press «Continue».

Figure 4: Follow the instructions and press the «Continue» button.
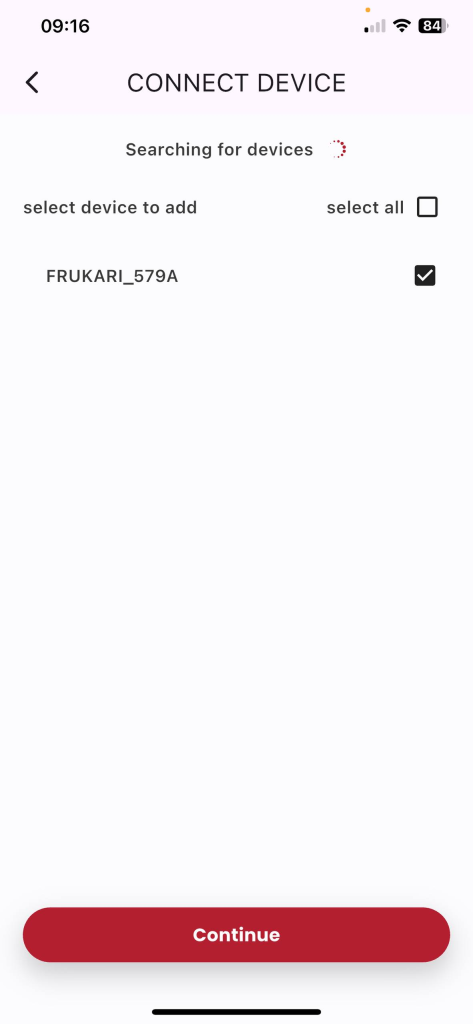
Figure 5: Select the registered device, press «Continue».
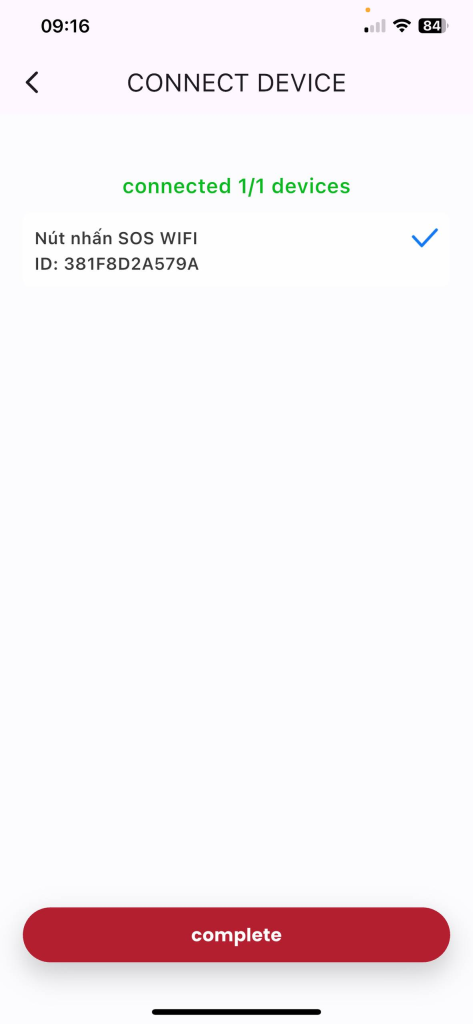
Figure 6: Wait for the automatic registration process to take place successfully, click «Finish».
3.2. Manual Registration Instructions
- Description: The customer manually registers the wireless push button to the Frukari App.
- Condition: Signed in to the Frukari App with owner rights and on the Home screen.
- Steps:
Step 1: Tap «Add Device» (Icon ![]() ).
).
Step 2: Select the «Wireless Push Button» Device Type.
Step 3: Enter the home Wifi network information: «Wifi Name» & «Password»
Step 4: Press «Continue».
Step 5: Tap «Setup» (Icon ![]() ).
).
Step 6: Select «Manual»
Step 7: Follow the instructions and press the «Continue» button.
Step 8: Press «Go to Connection» and make the wifi connection hostpost the device in the form of «FRUKARI-XXXX»
Step 7: Return to the app and press «Continue».
Step 9: Wait for the automatic registration process to take place successfully.
(Note: The registration process may fail due to the following reasons:
- 1. At B3: Enter the wrong home Wifi network information
- 2. At B7: Operation according to the wrong instructions)
Step 10: Switch back to wifi declared in step 3 (If required by the system)
Step 11: Press «Finish».

Figure 1: Tap «Add Device» (Icon ![]() ).
).

Figure 2: Select «Wireless Push Button» Device Type.
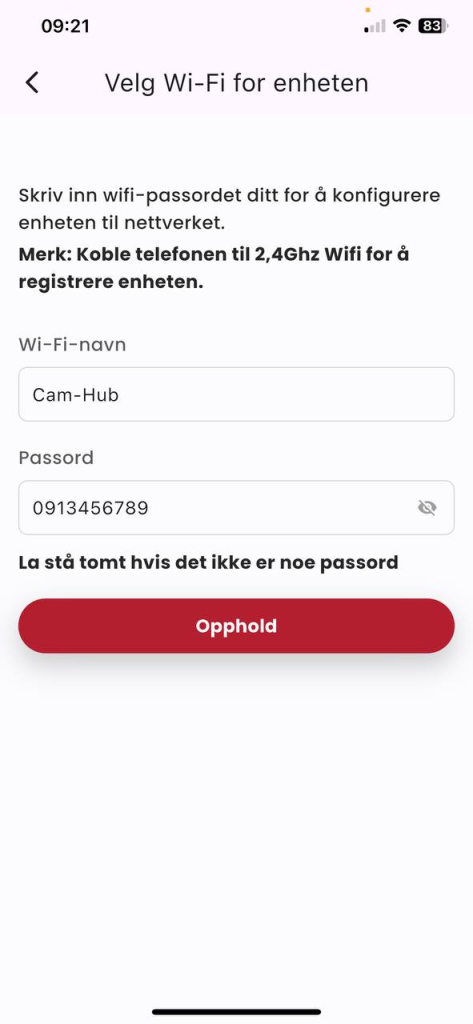
Figure 3: Enter the home Wifi network information: «Wifi Name» & «Password», press «Continue».

Figure 4: Click «Setup» (Icon ![]() ).
).

Figure 5: Select «Manual»

Figure 6: Follow the instructions and press the «Continue» button.

Figure 7: Press «Go to Connection» and make a wifi connection hostpost the device in the form of «FRUKARI-XXXX»
15

Figure 8: Return to the app and tap «Continue».
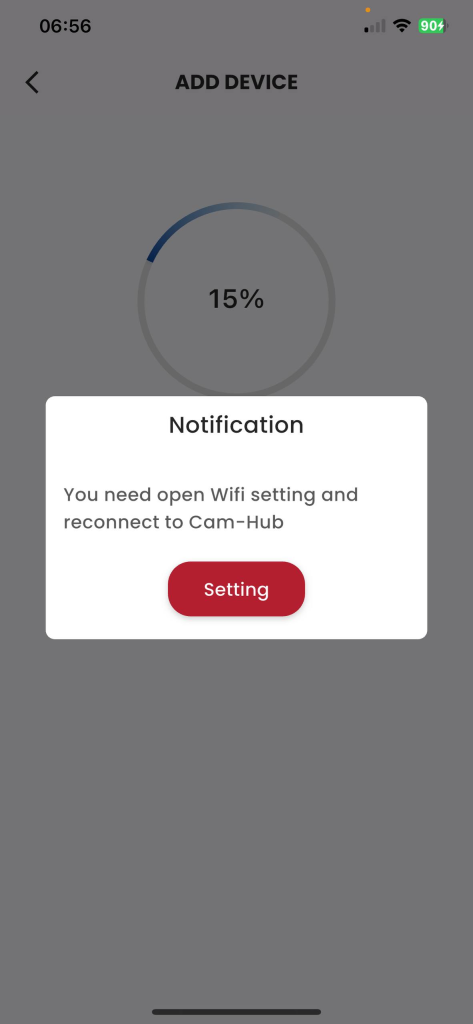
Figure 10: Switch back to wifi declared in step 3 (If the system requires it)

Figure 10: Wait for the manual registration process to take place successfully, click «Finish».
3.3. Instructions for Managing Device Operation History
- Description: The customer monitors the device activity status on the Frukari app.
- Eligibility: Have registered the door sensor with the Frukari App, have purchased the Standard/ Preemium package and are on the Home screen.
- Steps:
Step 1: Tap «All Devices».
Step 2: Press the wireless push button
Step 3: Tap «Activity History»

Figure 1: Tap «All Devices»

Figure 2: Press the Wireless Push Button

Figure 3: Click «History»
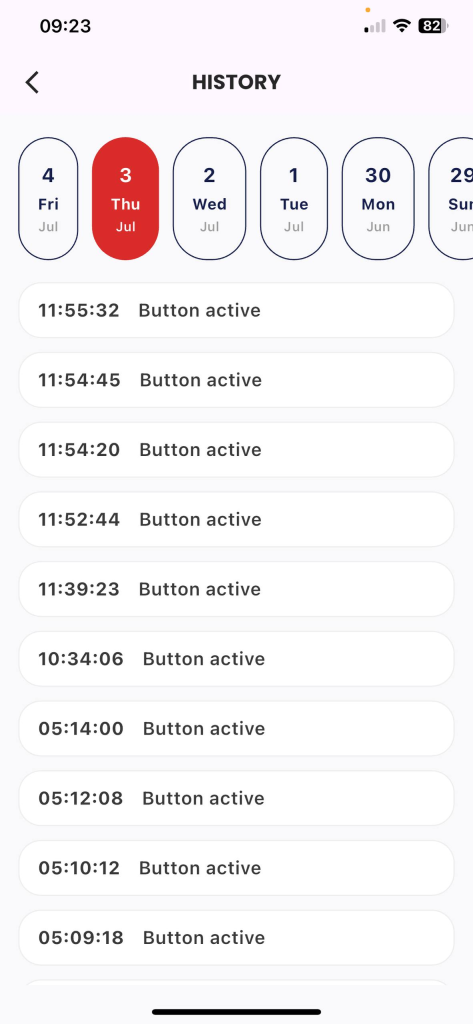
Figure 4: Activity history list screen
3.4. Instructions for updating device information
- Description: Customer updates wireless push button information.
- Condition: Signed in to the Frukari app with owner rights, wireless push button registered, and on the Home screen.
- Steps:
Step 1: Tap «All Devices».
Step 2: Press the wireless push button
Step 3: Tap «Setup» (Icon ![]() ).
).
Step 4: Select the «Device Information» section.
Step 5: Set the device name.
Step 6: Click «Save»

Figure 1: Tap «All Devices»

Figure 2: Press the Wireless Push Button

Figure 3: Click «Setup» (Icon ![]() ).
).

Figure 4: Select the «Device Information» section .
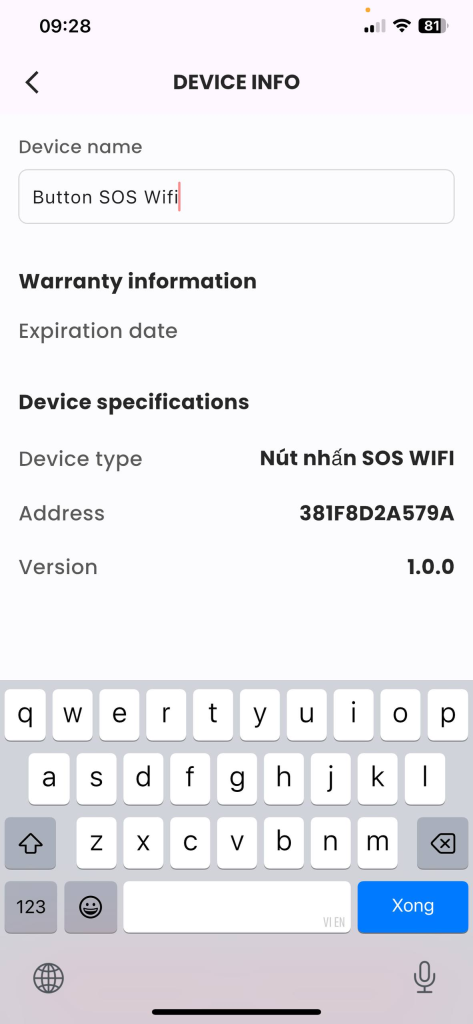
Figure 5: Setting up the device name.
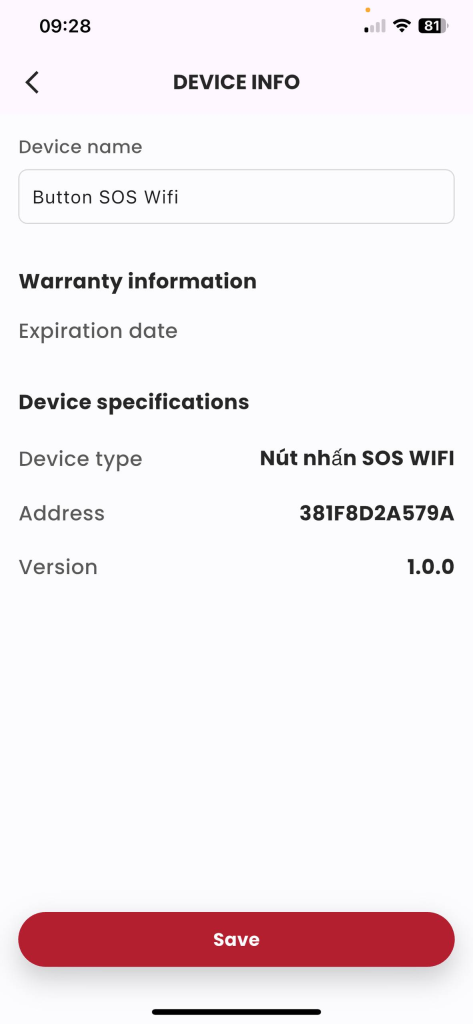
STEP 6: Click «Save»
3.5. Instructions for setting up notification mode
- Description: The customer activates/pauses the notification mode.
- Condition: Signed in to the Frukari app with owner rights, wireless push button registered, and on the Home screen.
- Steps:
Step 1: Tap «All Devices».
Step 2: Press the wireless push button
Step 3: Tap «Setup» (Icon ![]() ).
).
Step 4: Select the «Receive notifications» section.
Step 5: Press the Switch Button ON/OFF slider to the status to be set.

Figure 1: Tap «All Devices»

Figure 2: Press the Wireless Push Button

Figure 3: Click «Setup» (Icon ![]() ).
).

Figure 4: Select the «Receive notifications» section.
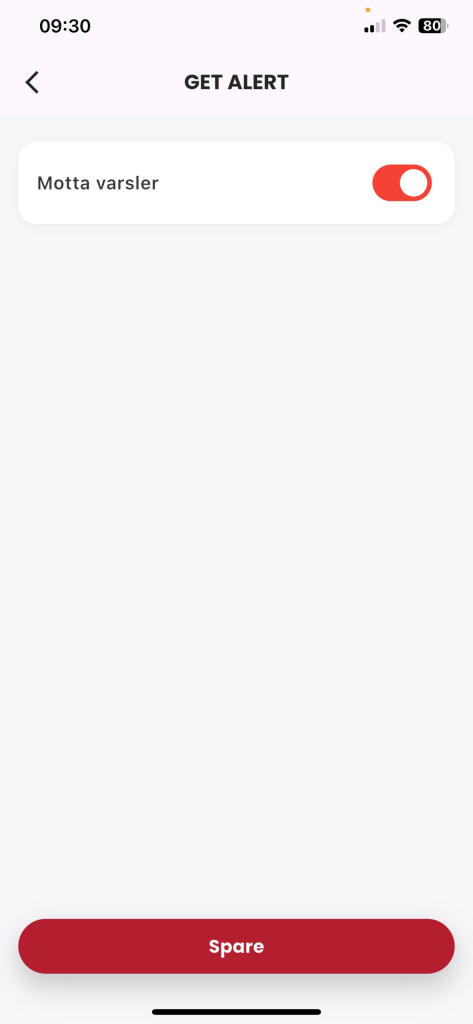
Figure 5: Press the Switch Button ON/OFF slider for the status to be set.
3.6. Automatic Connection Update Instructions
- Description: The customer updates the wireless push button connection by automatic method.
- Condition: Signed in to the Frukari app with owner rights, wireless push button registered, and on the Home screen.
- Steps:
Step 1: Tap «All Devices».
Step 2: Press the wireless push button
Step 3: Tap «Setup» (Icon ![]() ).
).
Step 4: Tap «Update Connection»
Step 5: Enter the home Wifi network information: «Wifi Name» & «Password»
Step 6: Tap «Continue».
Step 7: Follow the instructions and press the «Continue» button.
Step 8: Select the device to update the connection
Step 9: Press «Continue».
Step 10: Wait for the automatic registration process to take place successfully.
(Note: The registration process may fail due to the following reasons:
- 1. At B5: Enter the wrong home Wifi network information
- 2. At B7: Operation according to the wrong instructions)
Step 11: Press «Finish».

Figure 1: Tap «All Devices»

Figure 2: Press the Wireless Push Button

Figure 3: Click «Setup» (Icon ![]() ).
).

Figure 4: Tap «Update Connection»

Figure: Enter the home Wifi network information: «Wifi Name» & «Password», click «Continue».

Figure 6: Follow the instructions and press the «Continue» button.

Figure 7: Select the registered device, press «Continue».

Figure 8: Wait for the automatic registration process to take place successfully, click «Finish».
3.7. Manual Registration Instructions
- Description: The customer manually registers the wireless push button to the Frukari App.
- Condition: Signed in to the Frukari app with owner rights, wireless push button registered, and on the Home screen.
- Steps:
Step 1: Tap «All Devices».
Step 2: Press the wireless push button
Step 3: Tap «Setup» (Icon ![]() ).
).
Step 4: Tap «Update Connection»
Step 5: Enter the home Wifi network information: «Wifi Name» & «Password»
Step 6: Tap «Continue».
Step 7: Tap «Setup» (Icon ![]() ).
).
Step 8: Select «Manual».
Step 9: Follow the instructions and press the «Continue» button.
Step 10: Press «Go to Connection» and make the wifi connection hostpost the device in the form of «FRUKARI-XXXX»
Step 11: Return to the app and press «Continue».
Step 12: Wait for the automatic registration process to take place successfully.
(Note: The registration process may fail due to the following reasons:
- 1. At STEP 4: Enter the wrong home Wifi network information
- 2. At B6: Operation according to wrong instructions)
Step 13: Switch to wifi declared in step 3 (If the system requires it)
Step 14: Tap «Finish».

Figure 1: Tap «All Devices»

Figure 2: Press the Wireless Push Button

Figure 3: Click «Setup» (Icon ![]() ).
).

Figure 4: Tap «Update Connection»

Figure 5: Enter the home Wifi network information: «Wifi Name» & «Password», click «Continue».
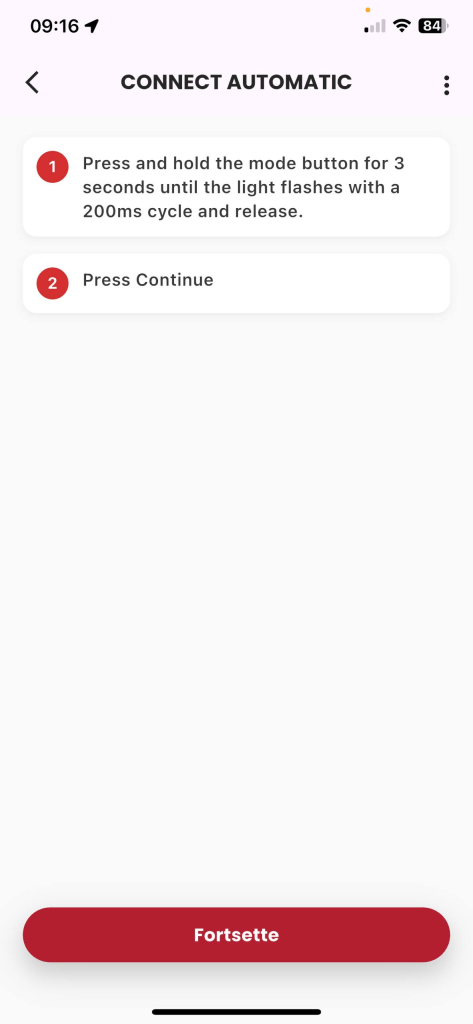
Figure 6: Click «Setup» (Icon ![]() ).
).

Figure 7: Select «Manual»

Figure 8: Follow the instructions and press the «Continue» button.

Figure : Press «Go to Connection» and make a wifi connection hostpost the device in the form of «FRUKARI-XXXX»
15

Figure 10: Return to the app and tap «Continue».

Figure 11: Switch back to wifi declared in step 3 (If required by the system)

Figure 12: Wait for the manual registration process to take place successfully, press «Finish».
3.8. How to update your device version
- Description: The customer updates the device version.
- Condition: Signed in to the Frukari app with owner rights, wireless push button registered, and on the Home screen.
- Steps:
Step 1: Tap «All Devices».
Step 2: Press the wireless push button
Step 3: Tap «Setup» (Icon ![]() ).
).
Step 4: Select the «OTA Update» item.
Step 5: Click «Update»
(Note: At step 5, the Update button is only visible when the device has not been updated to the latest available version.)

Figure 1: Tap «All Devices»

Figure 2: Press the Wireless Push Button

Figure 3: Click «Setup» (Icon ![]() ).
).

Figure 4: Select the «OTA Update» item .
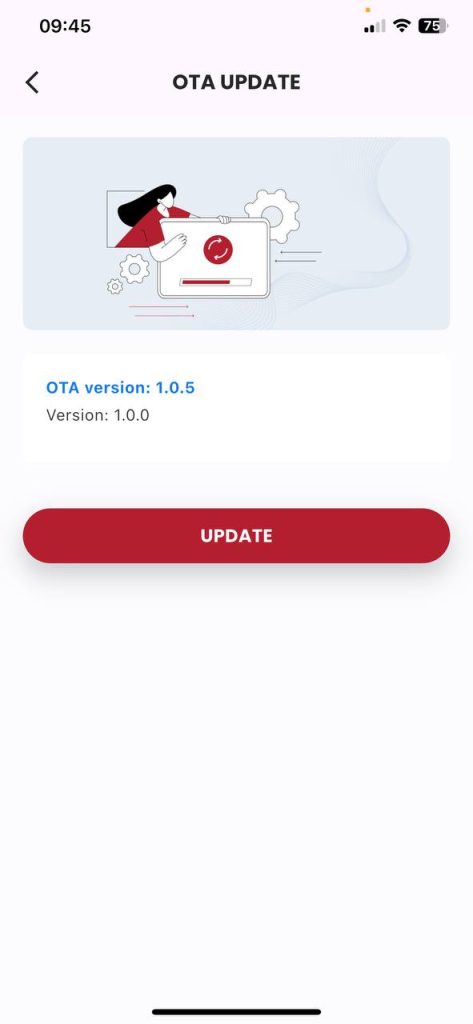
Figure 5: Click «Update»
3.9. Instructions for removing the device
- Description: Customer erases device.
- Condition: Signed in to the Frukari app with owner rights, wireless push button registered, and on the Home screen.
- Steps:
Step 1: Tap «All Devices».
Step 2: Press the wireless push button
Step 3: Tap «Setup» (Icon ![]() ).
).
Step 4: Click «Delete» .
Step 5: Click the «Agree» popup Confirm.

Figure 1: Tap «All Devices»
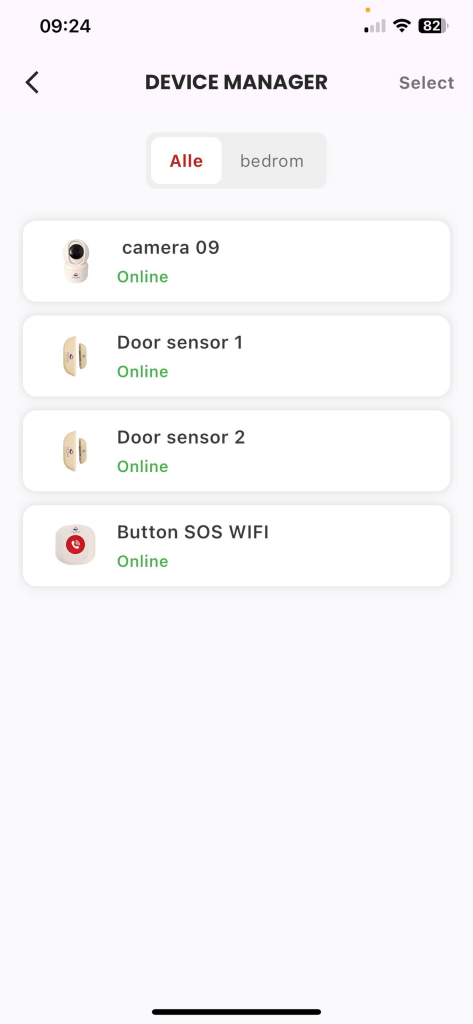
Figure 2: Press the Wireless Push Button
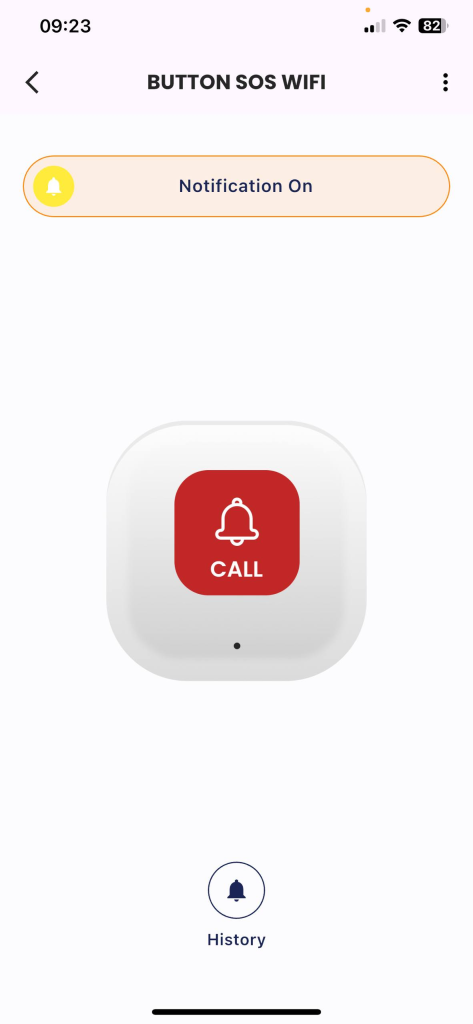
Figure 3: Click «Setup» (Icon ![]() ).
).

Figure 4: Tap «Erase Device»
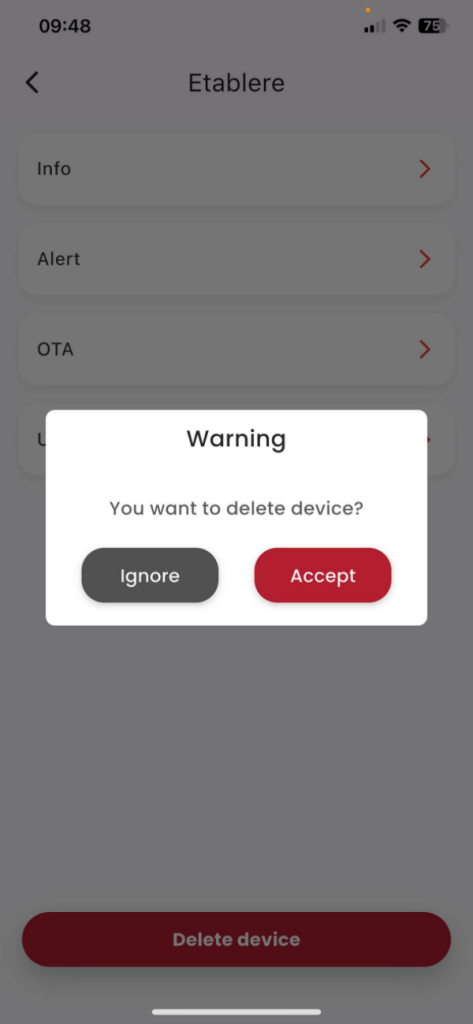
Figure 5: Click the «Agree» confirmation popup.